Upgrading Firmware
Introduction
It is possible to upgrade the firmware of your Tinymovr device in different ways, depending on the board you have:
Upgrade using DFU and CAN bus connection (fw 1.6 or later, boards shipped starting 8th Sep. 2023)
Upgrade using ActiveFlashlight and UART connection (fw 1.5 or earlier, boards shipped until the 7th Sep. 2023)
Upgrade using VSCode and J-Link (all boards)
A revision of the hardware connectivity and each of the above methods is provided below.
Connectivity
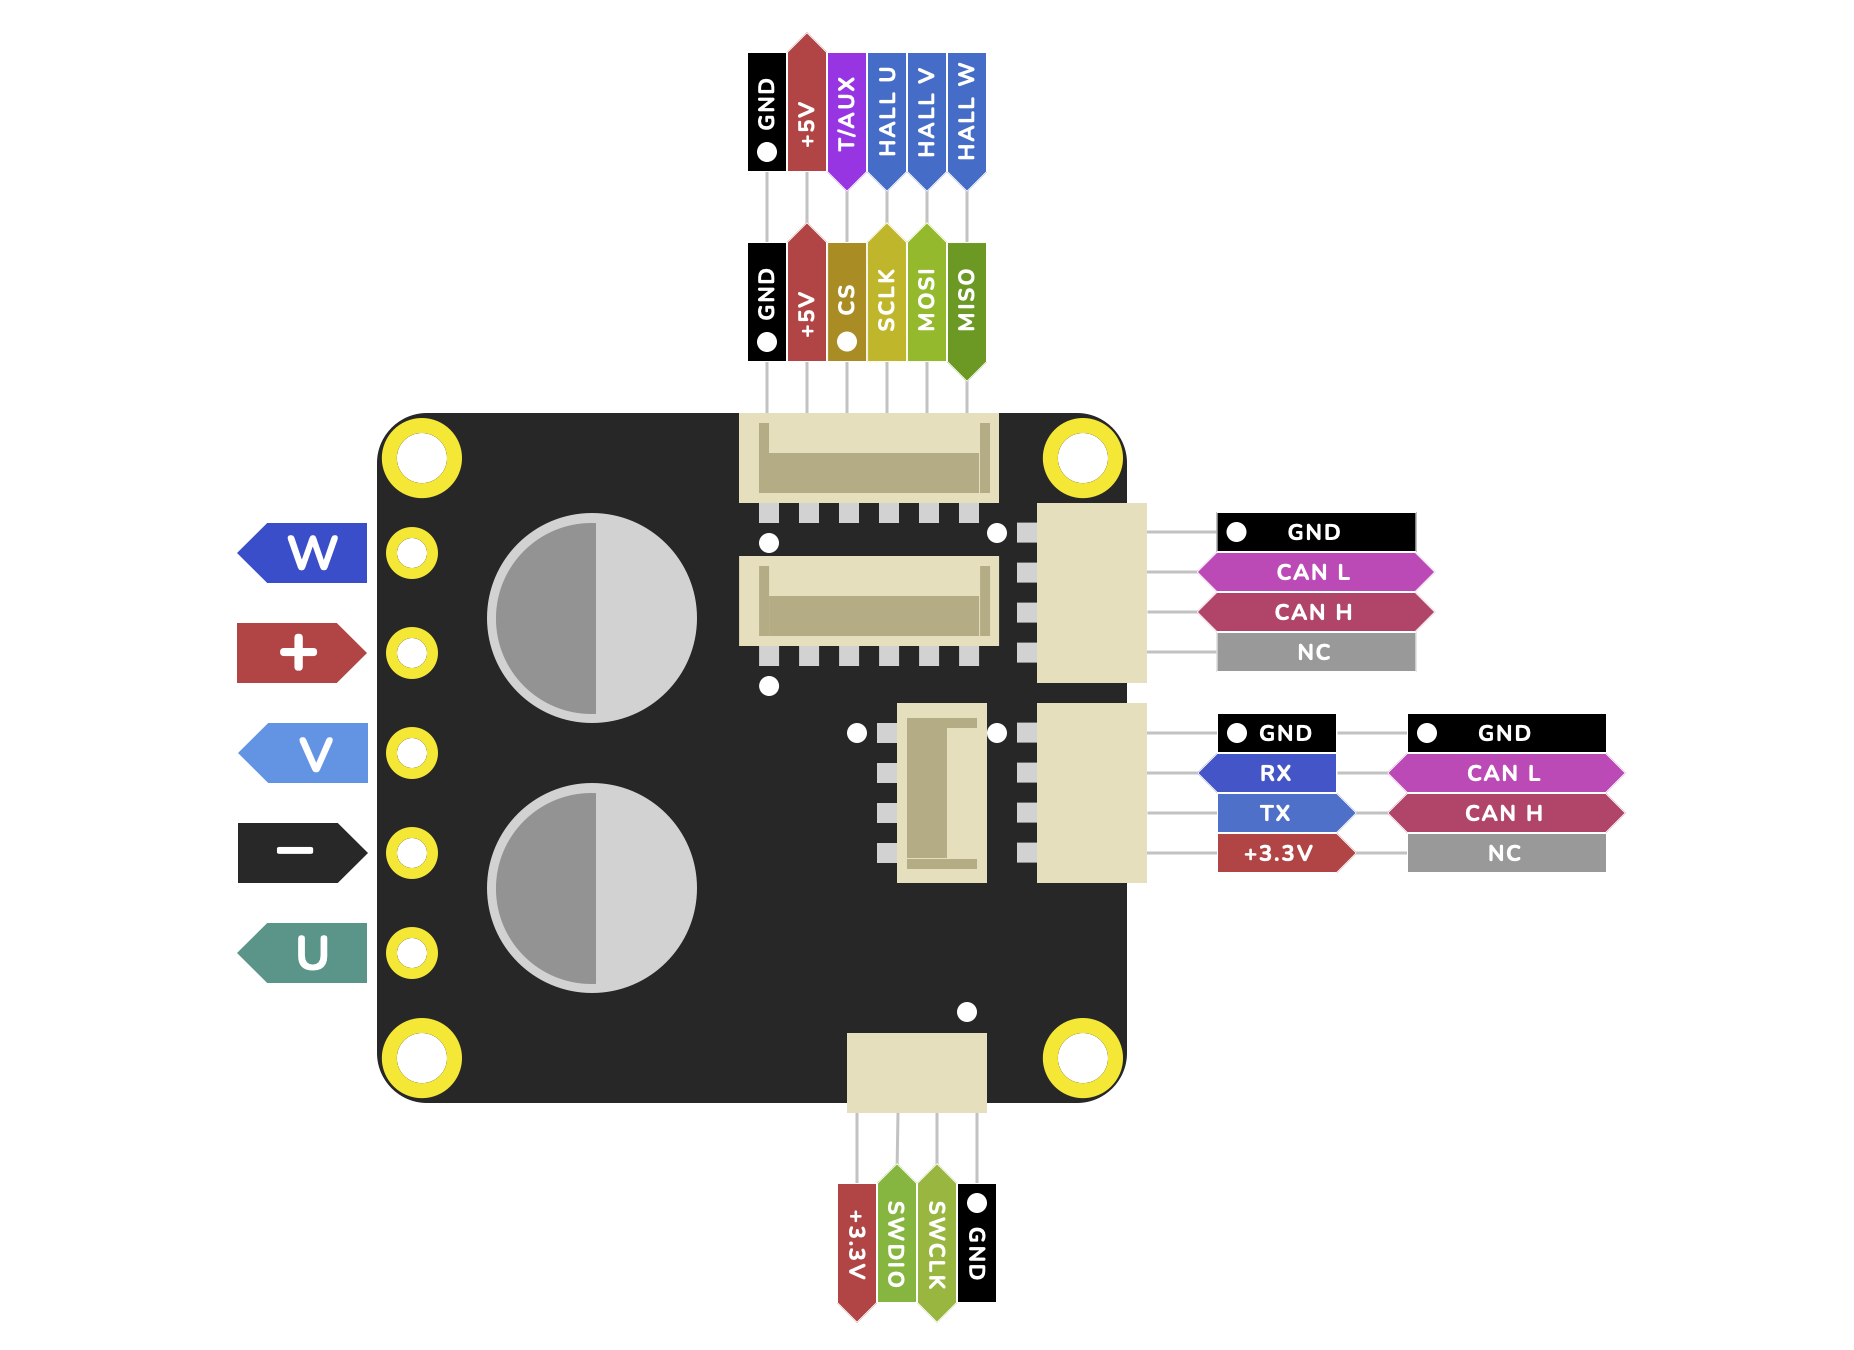
R5.2
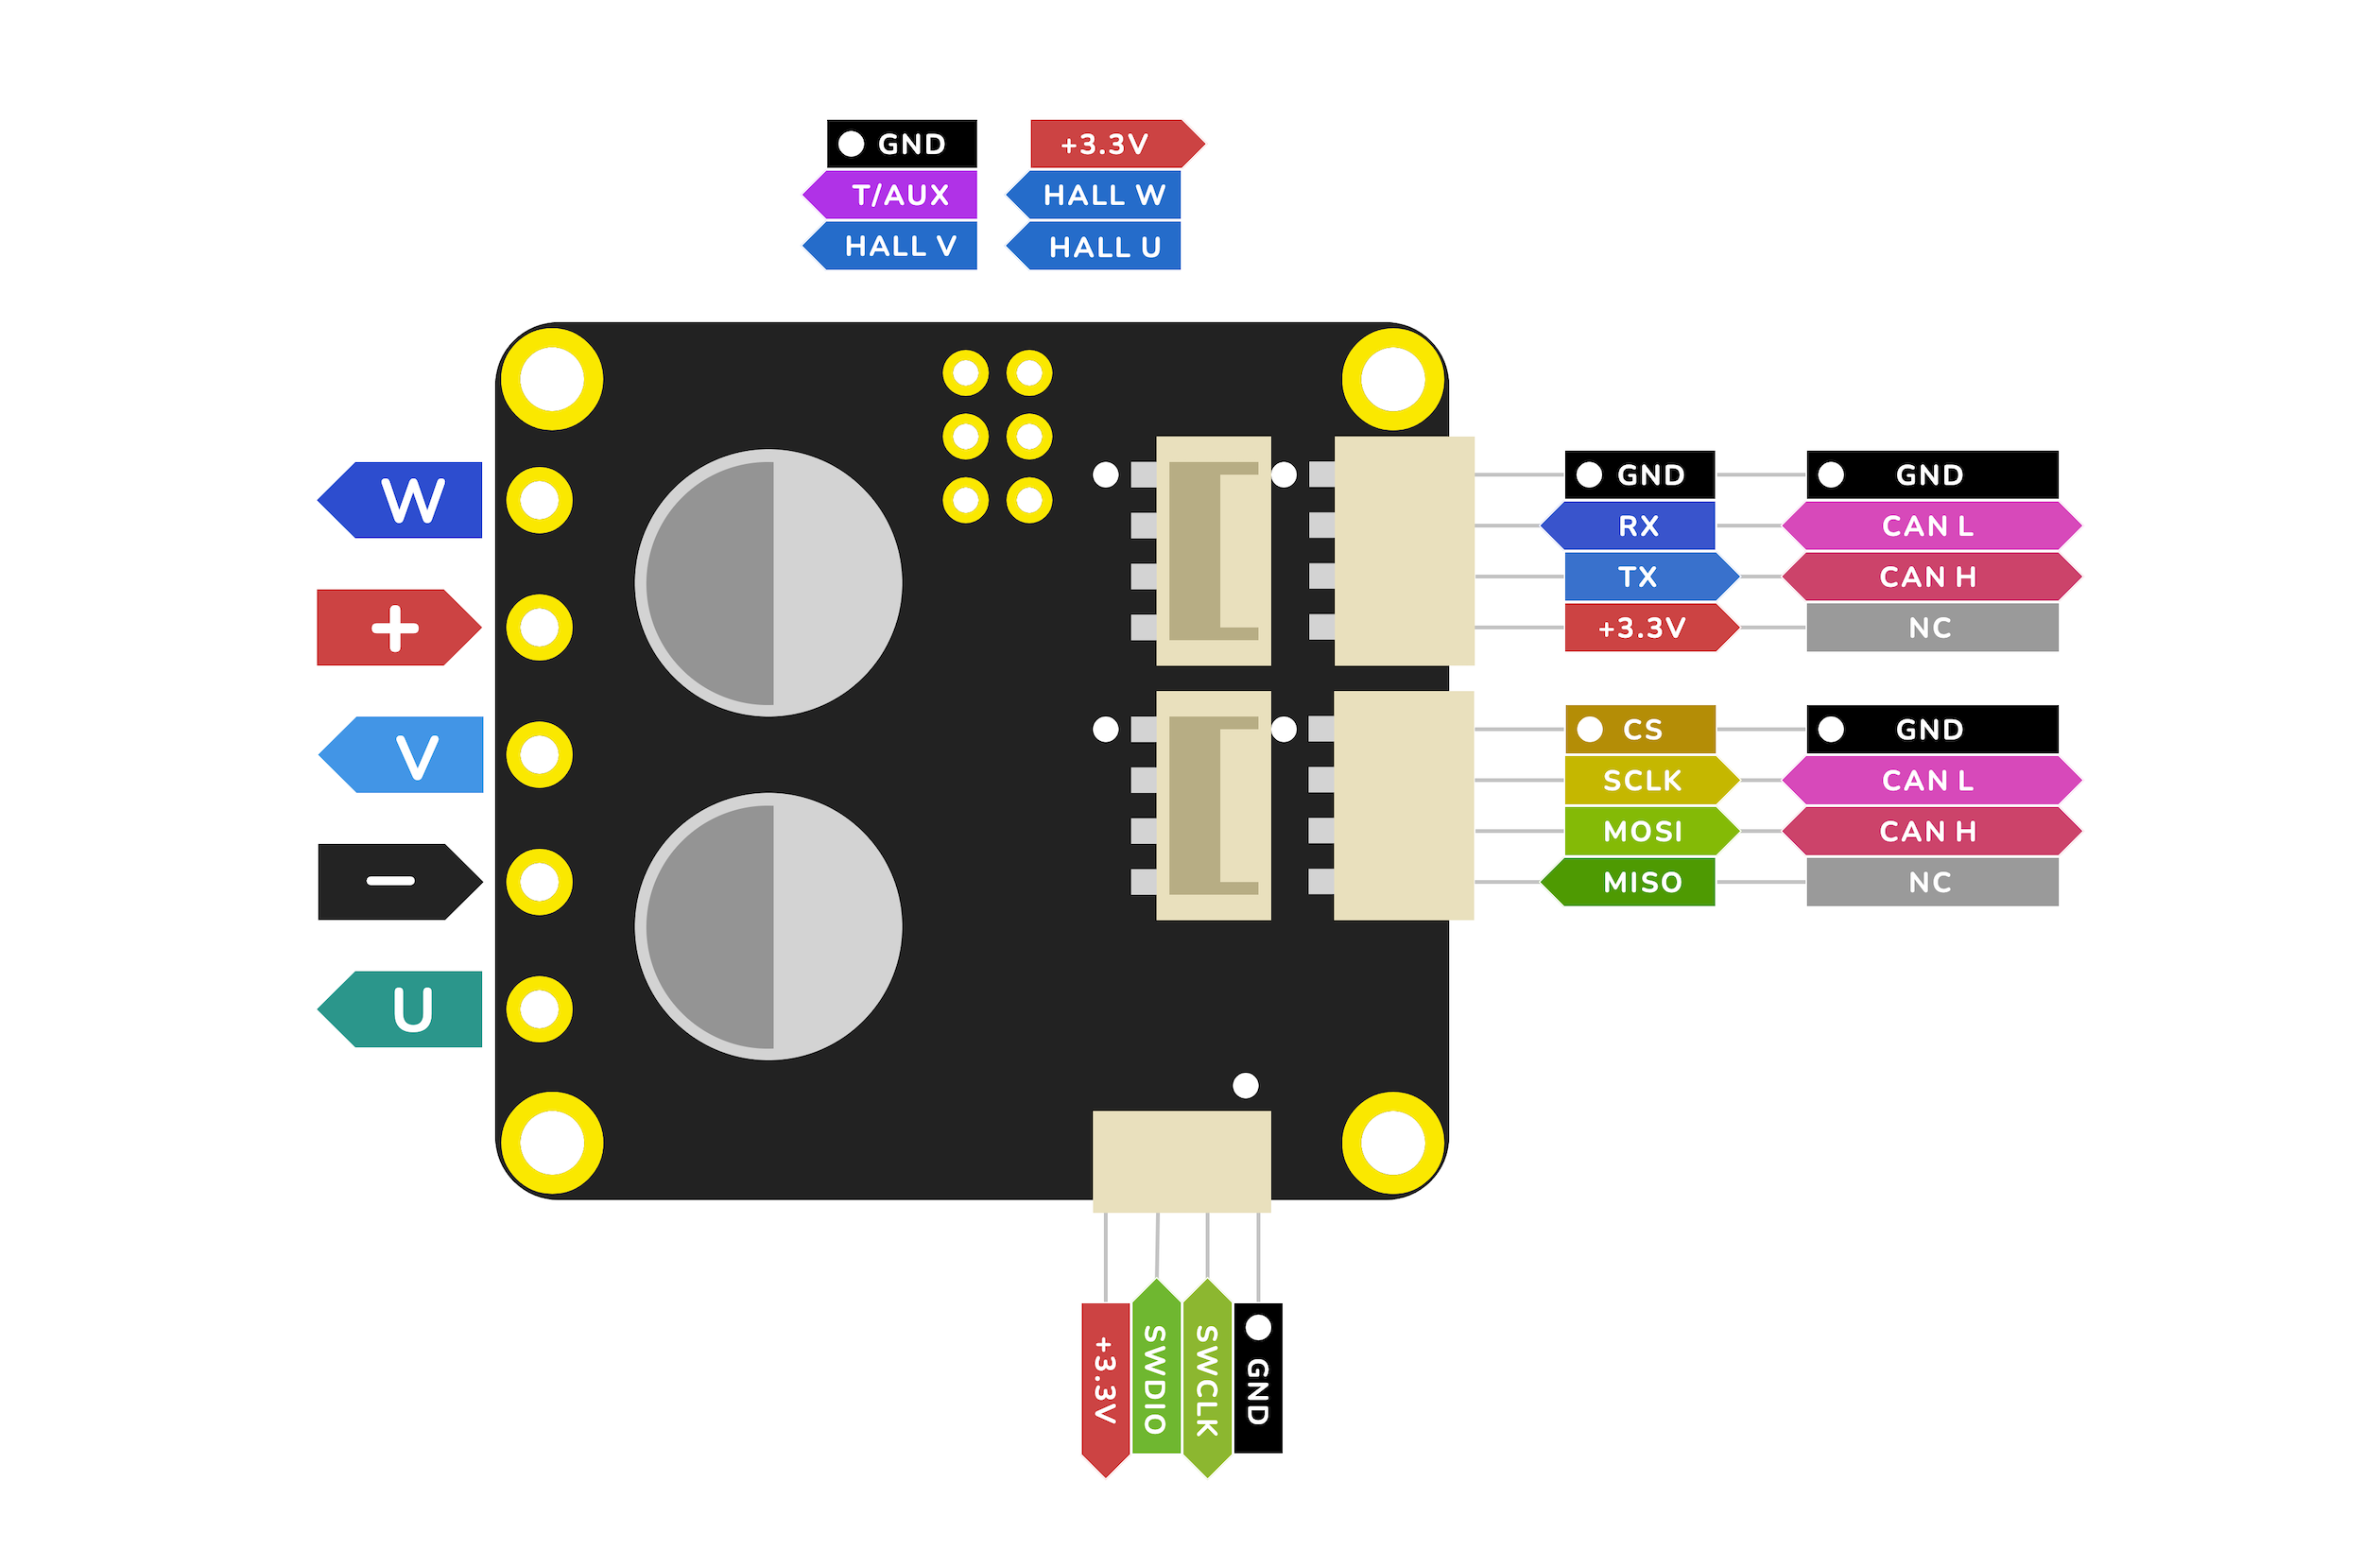
R5.0, R5.1
M5.1
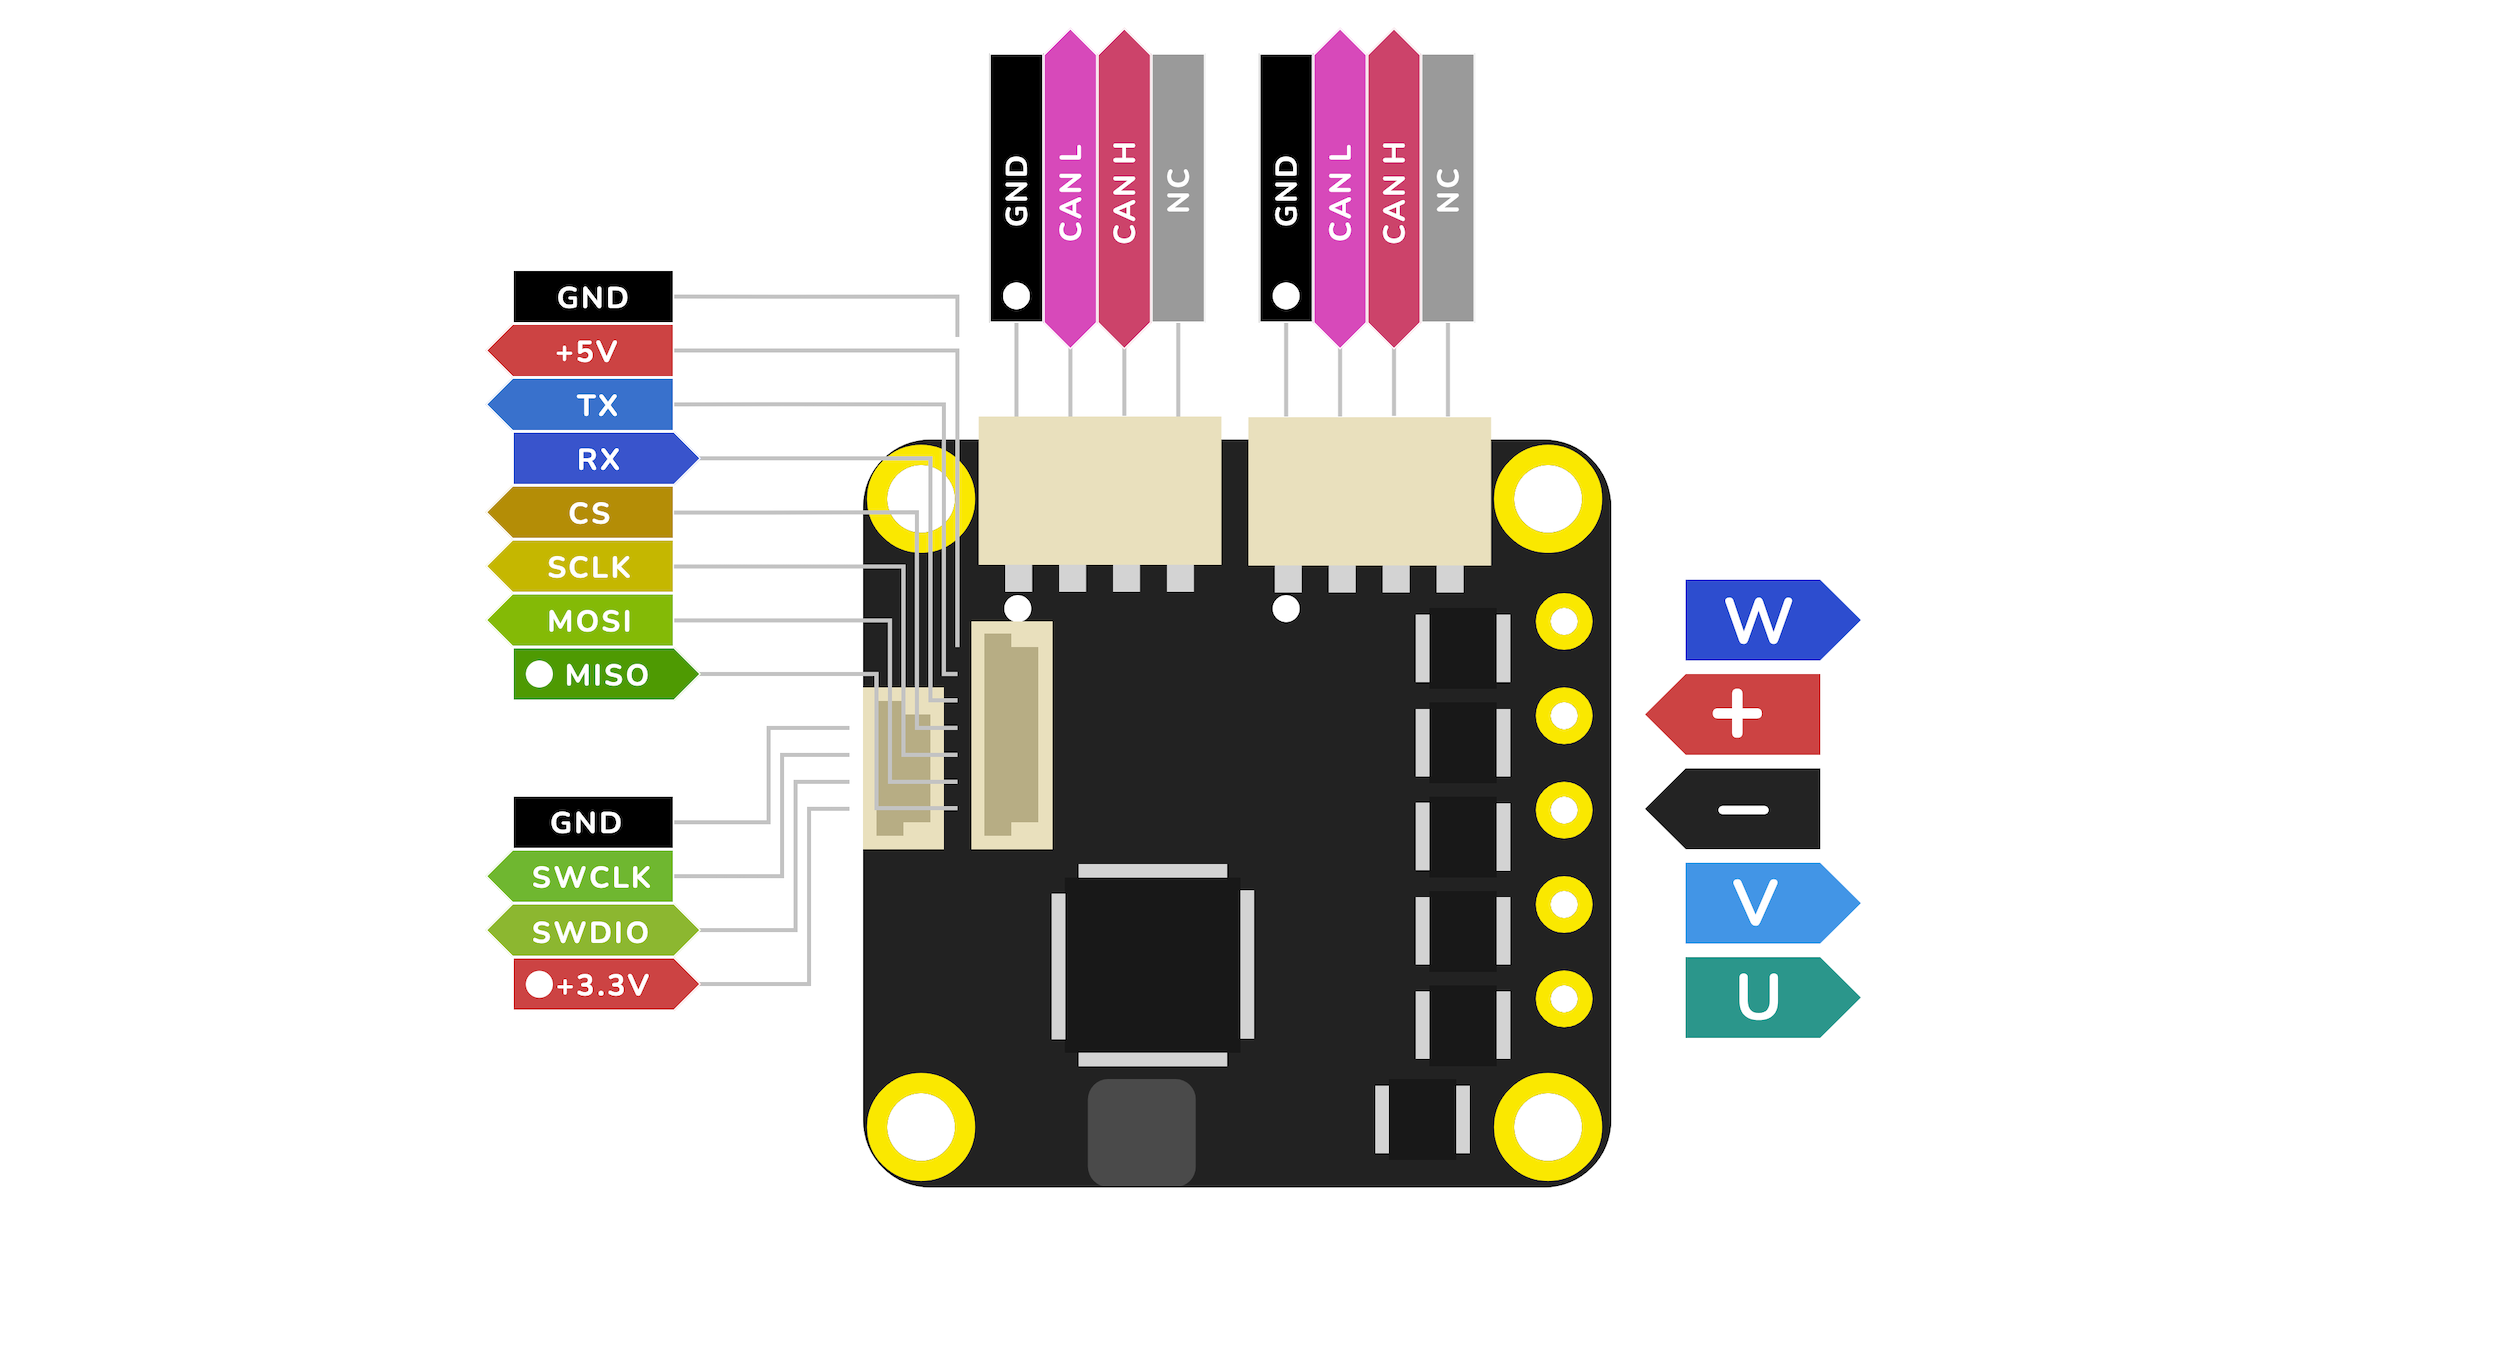
M5.2

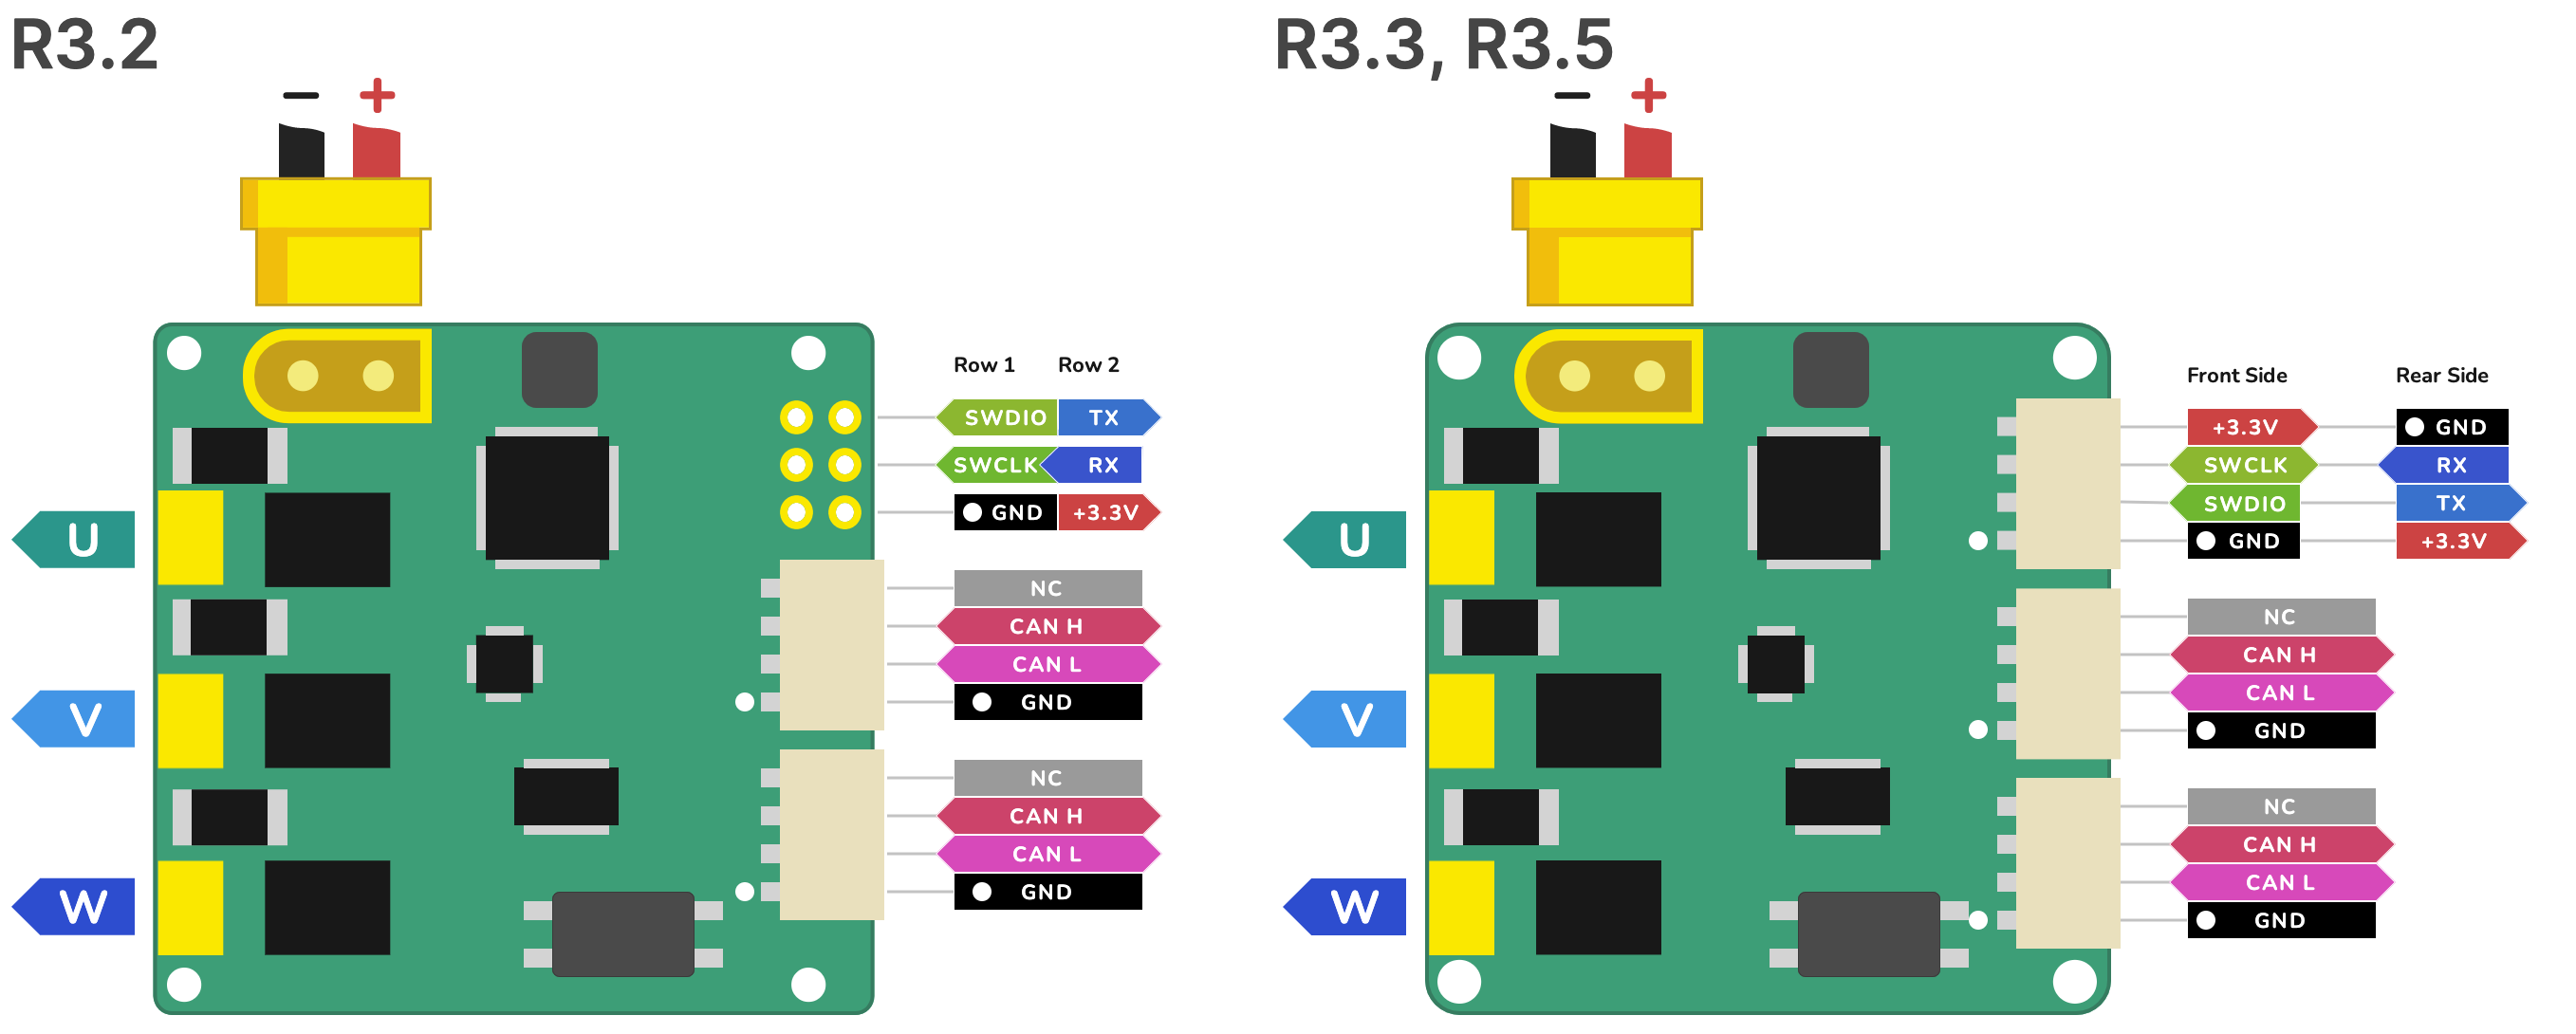
R3.x
Upgrade using DFU and CAN bus
Since firmware 1.6, we have streamlined the firmware update process with a bootloader that supports DFU through the native CAN bus interface. This guide will walk you through the steps to upgrade your Tinymovr’s firmware.
Prerequisites
Install the Tinymovr Package:
If you haven’t already, install the Tinymovr package. This package also comes with the required dependencies:
pip install tinymovr
Download the Firmware:
Head to the Tinymovr Releases Page and download the precompiled binary of the firmware that matches your board’s hardware revision. Firmware binaries follow the format:
tinymovr<firmware_version>-<hardware_revision>.bin. For instance, you might come across a file namedtinymovr1.5.0-M5.1.bin.
Flashing the Firmware
Set Up Your CAN Interface:
Ensure your CAN interface is connected and configured correctly with Tinymovr.
Enter DFU Mode:
Launch the Tinymovr CLI:
tinymovr_cli
Once inside teh CLI, type the following to enter DFU Mode:
tm1.enter_dfu()
Then exit the CLI by typing
exit.If you are getting an exception after this command, it means that either your Tinymovr does not come with the DFU bootloader, so you will have to Upgrade using ActiveFlashlight and UART, or your board is already in DFU mode.
Run the Script:
With the firmware .bin file you downloaded, execute the DFU script:
tinymovr_dfu --node_id=<your node id> --bin=path/to/your/downloaded/tinymovr<version>-<revision>.bin
Replace the placeholders in the path with the appropriate values based on where you’ve saved the .bin file and its name.
Example:
tinymovr_dfu --node_id=<your node id> --bin=~/Downloads/tinymovr1.5.0-M5.1.bin
To forgo the automatic reset post-flash, append the
--no-resetflag:tinymovr_dfu --node_id=<your node id> --bin=~/Downloads/tinymovr1.5.0-M5.1.bin --no-reset
Follow the Script’s Prompts:
The script initially checks if the device’s current firmware matches the .bin file. If they’re identical, it will bypass the flashing process. If not, it will erase the prior firmware, flash the new version, and validate the update.
Concluding Steps:
If you skipped using the
--no-resetflag, the device will reboot automatically after the update. If you used the flag, you’d need to power off and on the Tinymovr by hand.You’re all set! Your Tinymovr is updated and primed for use with the fresh firmware.
Note
Before updating, it’s a wise move to backup your current firmware and settings. Always pore over any version-specific instructions or release notes accompanying fresh firmware updates to stay informed.
CAN Node ID After Firmware Update
When upgrading firmware, the full device configuration (gains, limits, calibration, etc.) is invalidated because the firmware version changes. However, the CAN node ID is preserved across firmware updates. This means that on a multi-device CAN bus, each device retains its unique address after flashing and you can continue to update the remaining devices without ID conflicts.
The CAN ID is stored in a separate metadata header in flash with its own integrity check, independent of the main configuration data. As long as this metadata is intact, the device will boot with the correct ID even though the rest of the configuration reverts to defaults.
After upgrading, you will need to re-calibrate and re-configure your device (or import a previously exported configuration), but you do not need to reassign the CAN ID.
For details on how CAN node IDs are assigned, see Multiple Instances.
Recovery Mode
The DFU mode can be triggered upon device power up, which is useful to deal with problems resulting from inaccessible user firmware (e.g. mismatch between firmware and hardware revision). This feature will put the device into DFU mode immediately after power up. To use recovery mode, run the following command:
tinymovr_dfu --node_id=<your node id> --recovery
Then follow the instructions to trigger DFU mode. After this step, you will be able to Upgrade using DFU and CAN bus. You will need to know the device node ID to use this feature.
Upgrade using ActiveFlashlight and UART
Prerequisites
For this method you will need a USB to UART adapter or similar device to connect to Tinymovr’s UART interface, such as an FTDI interface or similar. Such devices are very common and inexpensive. Please follow the diagram below to correctly setup the UART interface.
Warning
The UART port on Tinymovr is NOT 5V tolerant. Applying 5V voltage will immediately damage the onboard PAC5527 controller. Please use only 3.3V for UART communication.
Warning
The UART port on Tinymovr offers a 3.3v output for driving very light loads (30mA absolute max). Tinymovr cannot be powered by this pin. In addition, most UART adapters offer 5V power, which is incompatible with Tinymovr. In short: If in doubt, leave this pin disconnected.
Flashing the Firmware
Warning
This is a legacy upgrade approach that is maintained here to facilitate existing users. New users should Upgrade using DFU and CAN bus
Qorvo, the maker of the PAC chip used in Tinymovr, provides an application to interface with the bootloader environment using UART and enable firmware upgrades. It is available through the Qorvo website as an archive named “PAC55xx ActiveFlashLight Bootloader”. Please download and extract the archive and follow these steps:
Inside the “resources” folder run the ActiveFlashLight application
Power on Tinymovr
Under ‘COMMUNICATION’ click on ‘Connect’
Power off and on Tinymov. The application status should now indicate that it is connected to the device.
Under ‘PROGRAMMING’ click on ‘Browse…’ and find the latest ‘tinymovr<firmware_version>-R<board_revision>.bin’ file for the board being used, which can be downloaded from releases. Also take note of any version specific instructions in the release notes.
Under ‘PROGRAMMING’ click on ‘Auto Program’. The application will erase, flash and verify the device with the new firmware. Wait for the process to complete
Once complete, power off Tinymovr and quit the application
You should now be able to use Tinymovr as usual with the new firmware.
Upgrade using VSCode and J-Link
Please see Using VSCode.
Warning
Depending on the hardware revision and the batch, either a vertical or a sideways JST-SH connector is used for SWD. In any case, the pin order shown in the above figures is correct. Please consider this when connecting your SWD adapter.