Developers
Overview
This document provides a guide for setting up a development environment for developing for Tinymovr, including firmware and client software (Studio).
Hardware Connections
For proper debugging capabilities you will need a Segger J-Link adapter. Unfortunately original J-Link adapters are quite expensive. A more affordable option is the J-Link EDU adapter at around $60 or the J-Link EDU mini adapter at around $20. In addition, there are J-Link clones that can be purchased for very low prices on ebay or Aliexpress. However, reliability of these clones is not guaranteed, and we do not provide support when using these clones.
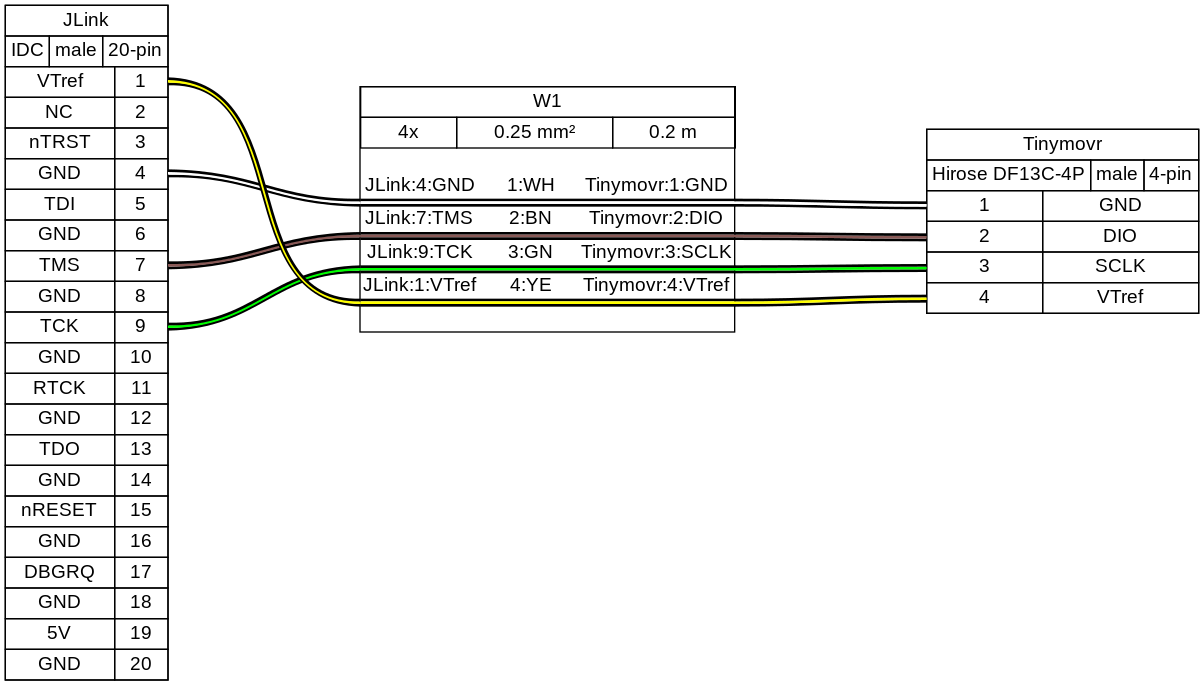
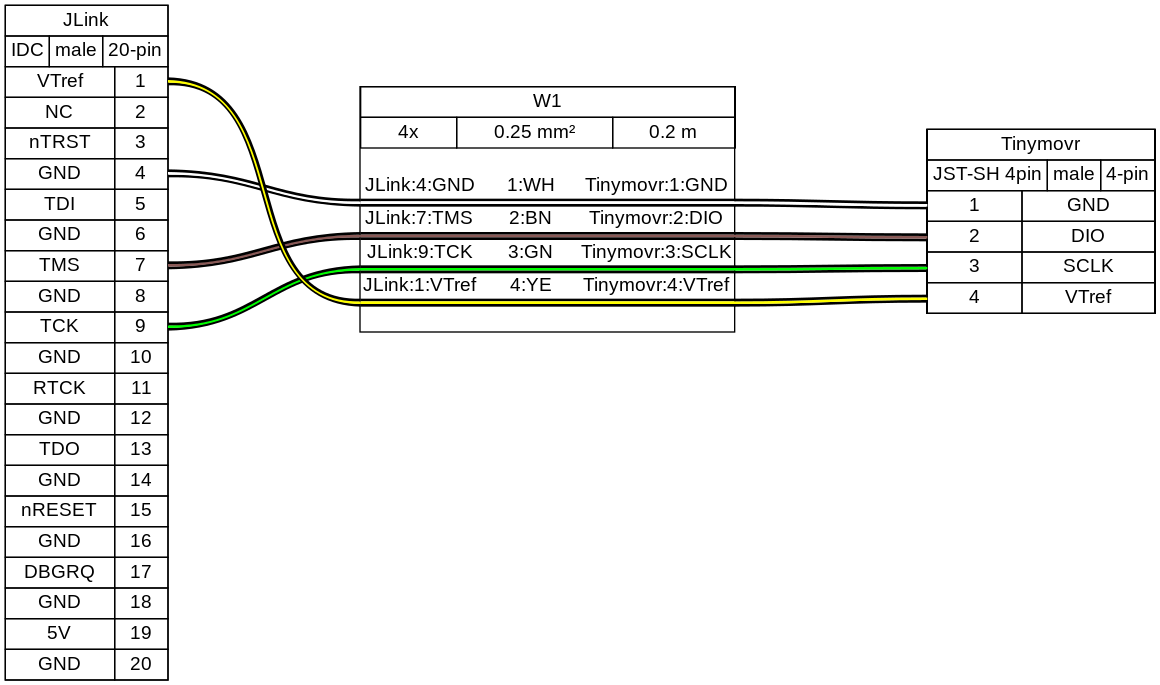
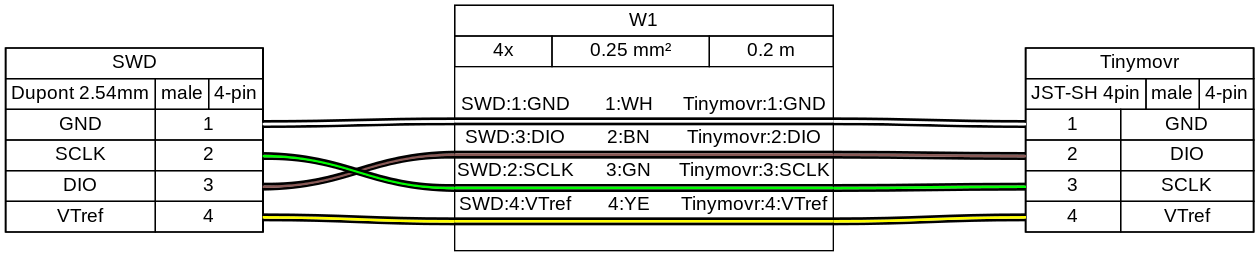
With the board and J-Link adapter powered off, connect the J-Link to Tinymovr as shown below:
Connection directly to J-Link adapter for R3.x:
Connection directly to J-Link adapter for R5:
Connection with SWD adapter (e.g. isolator) for R3.x:

Connection with SWD adapter (e.g. isolator) for R5:
(diagrams made with Wireviz)
As of Tinymovr 1.0.1, it is no longer necessary to patch the JLinkDevices.xml file (in firmware/pac55xx_device_pack/) with the PAC additions, in order for JLinkGDBServer to work properly. Relevant files are included in the repo.
Preparation
First, clone the Tinymovr repo:
git clone https://github.com/yconst/Tinymovr
The Tinymovr repo includes the firmware source code and supporting files, however the PAC55xx SDK is not included due to licensing restrictions imposed by Qorvo. Thus, you will need to download it from the Qorvo website, where you will need to supply your email.
The file comes in a zipped installer exe (!), which all it does is extract the contents to a directory. Navigate to the extracted files directory and copy the ‘pac55xx_sdk’ directory inside the Tinymovr repo:
cp -r <pac55xx_sdk_location> <tinymovr_location>/firmware/pac55xx_sdk/
In any case, the target directory should be named pac55xx_sdk. The above copy command ensures this.
Now you have the required PAC SDK almost ready. There is a small patch that you will need to apply in the pac55xx_sdk directory. It is suggested to use the Python patch package, which is cross-platform. If you do not have the package, install using pip:
pip3 install patch
Then:
cd <tinymovr_location>/firmware
python3 -m patch sdk_patch.patch
As a final step, install the GNU Arm Embedded Toolchain.
If you are in Windows you will also need to install GNU make. This is rather easy in Windows 10 or later:
choco install make
Using VSCode
Our development environment for Tinymovr utilizes VSCode and is designed with cross-platform compatibility in mind. We support all major operating systems: Linux, MacOS, and Windows. This method allows for a unified approach to building, flashing, and debugging firmware.
We take great pride in creating this in-house, cross-platform development solution, as an alternative to the official Windows-only solution, providing enhanced flexibility and simplifiyng the process of developing for Tinymovr across multiple platforms.
Configuring
You’ll need to configure the path to the JLink debug server in .vscode/launch.json. The configuration blocks look like this:
"windows": {
    // Update the path below as necessary
    "serverpath": "C:\\Program Files\\SEGGER\\JLink\\JLinkGDBServerCL.exe"
},
"linux": {
    // Update the path below as necessary
    "serverpath": "/opt/SEGGER/JLink/JLinkGDBServer"
}
There are several instances of such blocks in the file that need to be updated.
Building
To try out a test build from within VSCode select Terminal -> Run Task... from the menu bar, and select Clean and Build Project (Debug).
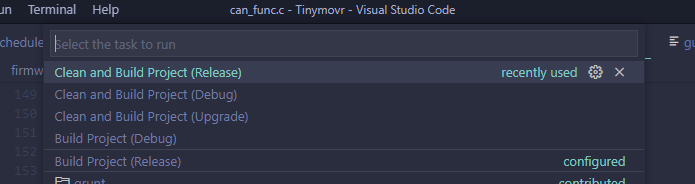
Tinymovr implements board revision selection using an input menu with a few predefined choices.
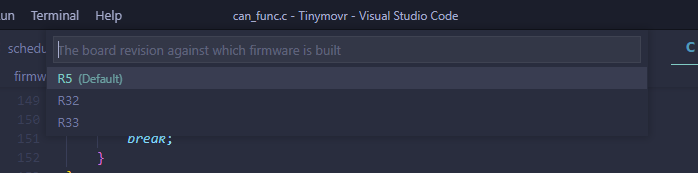
Select the board revision against which you are compiling from the list. The build process will start, it usually takes less than half a minute. After it finishes, you should end up with a build/ directory inside firmware/ and there you should see the files tinymovr_fw.elf, tinymovr_fw.hex and tinymovr_fw.bin.
More about Hardware Revisions
Tinymovr passes the BOARD_REV_XX argument regarding the board revision to the compiler. This is used in the firmware to configure the hardware accordingly. Invoking a make command with the REV argument is as follows:
make debug REV=R5
Currently the following hardware revision values are supported:
R32
R33
R50
R51
R52
M5
Flashing and Debugging
Before debugging, make sure the J-Link drivers and software is installed. The drivers and software, together with instructions, can be found in the Qorvo website, under the download ‘Segger J-Link Support’. This download includes a nacessary patch to enable J-Link to work with Qorvo devices. Instructions on how to apply the patch are included in the download.
The Tinymovr repo includes all VSCode settings configured, except for the JLink serverpath variable in launch.json, which you’ll need to update to reflect your system. Note that there are multiple instances in the file, you’ll need to update all of them.
We offer various VSCode launch configurations to suit different development and debugging tasks, including remote Tinymovr flashing debugging using a remote JLink server. These are are briefly outlined below.
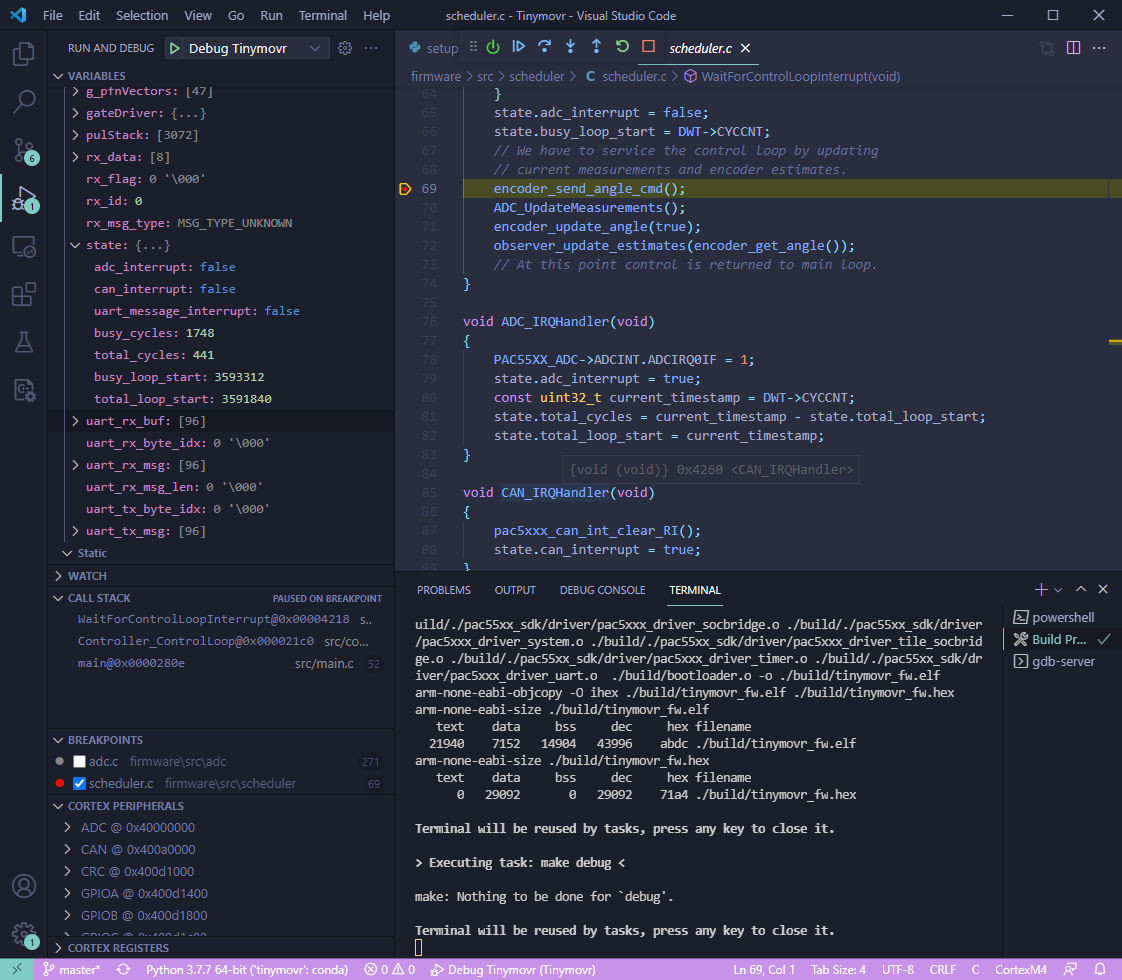
Rebuild Debug and Start Session
This is a convenience configuration that does a clean debug build, flashes it and launches a debug session. After a while the debug session should start and you should see a screen like below:
Rebuild Release and Flash
This is a convenience configuration that does a clean release build and flashes it to Tinymovr.
Flash Built Binary and Start Session
This will flash an already built binary and start a debug session. It assumes a binary already exists in the firmware/build/ directory.
Flash Built Binary
This will flash an already built binary. It assumes a binary already exists in the firmware/build/ directory.
Attach to Target
This will attach to an already running target.
Flash Built Binary and Start Remote Session
This will connect to a remote JLink server, upload the firmware to the remote Tinymovr device, and start a remote debug session. You will need to have a JLink Server configured on a network attached device, such as a Raspberry Pi (here is a good guide on how to do that). You will also need to input the remote device’s IP address to the ipAddress field of the launch.json file.
Note that the launch configurations can be selected and initiated from the VSCode “Run and Debug” pane. You can also hit F5 to launch the currently selected configuration.
Congrats! You are now fully set to start with Tinymovr development!
Using ST-Link (Alternative to J-Link)
As a more affordable alternative to J-Link, you can use ST-Link V2 or V3 adapters with PyOCD. ST-Link V2 clones are widely available for as little as $3-10.
The Tinymovr repo includes a custom PyOCD target pack that enables ST-Link support for the PAC5527 MCU.
Prerequisites
Install PyOCD:
pip install pyocd
PyOCD can be installed globally or in a virtual environment. The VSCode tasks and Makefile targets use the firmware/scripts/pyocd_run.sh wrapper script, which automatically discovers PyOCD in the following locations (in order of priority):
System PATH (global install)
Project virtual environment at
<workspace>/venv/
Note
The pyocd_run.sh script is necessary because Makefile commands spawn a new shell without access to any activated virtual environment. The script ensures PyOCD is found regardless of how it was installed.
The ST-Link hardware connects to Tinymovr using the same SWD pinout as J-Link (GND, SWDIO, SWCLK, VTref). See the connection diagrams above.
VSCode Launch Configurations
The repo includes several ST-Link configurations in .vscode/launch.json, all prefixed with [ST-Link]:
[ST-Link] Rebuild Debug and Start Session - Clean debug build, flash, and start debugging
[ST-Link] Rebuild Release and Flash - Clean release build and flash
[ST-Link] Flash Built Binary and Start Session - Flash existing binary and debug
[ST-Link] Flash Built Binary - Flash existing binary only
[ST-Link] Attach to Target - Attach to running target
When the debug session ends, the PyOCD GDB server is automatically terminated.
Command Line Usage
You can also flash directly from the command line using Make targets:
cd firmware
make release REV=R52
make flash-stlink
Additional Makefile targets:
make flash-stlink- Flash the built binarymake erase-stlink- Erase the entire chipmake reset-stlink- Reset the target
Or use PyOCD directly:
pyocd flash -t pac5527 --pack firmware/pac55xx_device_pack/ firmware/build/tinymovr_fw.bin
pyocd gdbserver -t pac5527 --pack firmware/pac55xx_device_pack/
Limitations
ST-Link support uses PyOCD’s implementation of the PAC55XX flash algorithm. If you encounter issues, J-Link remains the recommended option.
Remote debugging (like the J-Link remote server setup) is not supported with ST-Link configurations.
Using Eclipse
Eclipse is no longer supported. Consider Using VSCode instead.
Setup Studio for Development
Tinymovr Studio is a Python application and as such can be easily set up to facilitate development. The approach is to use pip to install Tinymovr in develop mode, from a local copy of the (git repo <https://github.com/tinymovr/Tinymovr>``_). This allows any changes you make to the local code to be immediately available when you run the executable (``tinymovr, tinymovr_cli, or tinymovr_dfu).
Note
We recommend installing Tinymovr in a virtual environment. Here is a quick tutorial on how to setup a virtual environment using Conda.
Clone the Tinymovr repo as outlined in the first step of Preparation. Then:
cd <tinymovr_location>/studio/Python/
pip3 install -e .
or to enable GUI support:
pip3 install -e .[GUI]
This will install the Tinymovr Studio in develop mode. Now, tinymovr, tinymovr_cl`i and tinymovr_dfu will use the local Tinymovr Studio code.
Happy coding!
Custom Device Definitions
Tinymovr uses YAML files for device specification (the spec). Device spec files reside in {tinymovr_package_dir}/studio/Python/tinymovr/specs/. This is where files covering Tinymovr firmware 1.3.x to 1.6.x are situated by default.
You can add custom device spec files in this directory to tell Tinymovr Studio GUI, CLI and library how to communicate with custom devices. For instance, assuming that you have installed Tinymovr Studio using pip3, you will need to find the directory of the tinymovr package first using the command below:
Windows
python -c "import os, tinymovr; print(os.path.dirname(tinymovr.__file__))"
Macos and Linux
python3 -c "import os, tinymovr; print(os.path.dirname(tinymovr.__file__))"
Then, paste your custom spec file to {tinymovr_package_dir}/studio/Python/tinymovr/specs/. Tinymovr should correctly discover your custom device.